

Install Reactive Resume V3 on Synology: A Guide to the 3.8.4 Setup
Set up historical Reactive Resume 3.8.4 on Synology with Portainer, use a private LAN address and check sample data after a stop/start cycle.
Eugene Gavrilov
15 min read- NAS & storage
Reactive Resume is a resume builder you can run on your NAS. If you specifically need V3, your first goal is to create a fictional sample resume, check it after a restart, and find its saved data.
This guide covers self-hosted Reactive Resume 3.8.4, a historical version, rather than the hosted rxresu.me website. Current deployment instructions use a different setup; do not mix their images or settings with this one. The procedure adapts historical upstream files and a Synology recipe for a private network. It has not been run on a physical NAS for this article. Current image availability, PDF export and recovery have not been verified for this article.
Keep this first installation on your trusted home network. You do not need to set up a domain, reverse proxy, certificate or router port forwarding for the LAN configuration below. Use fictional data while checking it: the HTTP addresses do not encrypt traffic.
In this guide:
- Understand the three parts
- Check your NAS and prepare storage
- Choose the addresses and private settings
- Deploy the stack
- Create and check your first resume
- Back up before depending on it
- Troubleshoot, pause or remove the installation
Understand the three parts
Reactive Resume is a resume editor. V3 supports multiple resumes under one account and provides JSON and PDF export features. You will check those features separately after the editor opens.
The client provides the editor in your browser. The server handles application requests and uses PostgreSQL, the database, to store accounts and resume records. The server also has separate folders for uploads and generated exports.
An image is the packaged application; a container is a running copy of it. You will describe the three containers and their settings in a Compose file, then give that file to Portainer to run them together. Portainer calls that group a stack. A bind mount connects a folder on the NAS to a folder in a container, keeping the saved data outside the replaceable container.
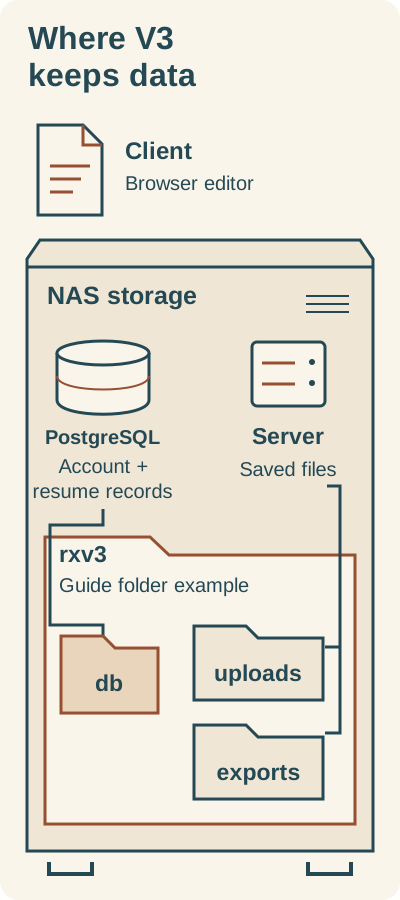
Storage roles in this guide’s V3 configuration. An explanatory illustration, not a tested deployment.
Text alternative: The client provides the browser editor. PostgreSQL stores accounts and resume records through the db folder; the server uses uploads and exports. These folders sit inside this guide’s example rxv3 folder on the NAS, outside the replaceable containers.
Check your NAS and prepare storage
Before creating the stack, check these prerequisites:
- A container-capable NAS. Check your NAS model and DSM version, then confirm that Package Center offers Container Manager or the older Docker package for that device. If neither is available, stop here. This guide does not bypass model support.
- An AMD64 processor. The YAML below uses historical AMD64 image tags, typically for Intel or AMD hardware. Historical ARM64 builds used different tag names; do not assume these images fit every Synology model. Current registry availability has not been checked.
- Administrator access. You need to manage your NAS and its containers.
- A password manager. Prepare separate database and application secrets, and save the account password you create later. The minimal stack does not configure password-reset email.
Make sure Portainer is ready
Portainer is a separate web application for managing containers; it is not automatically included in DSM. This article starts after Portainer is installed and connected to your NAS.
Open your Portainer address, sign in, select the Docker Standalone environment that manages this NAS, and open Stacks. Environment names vary; yours need not be called “local.” Check: You can reach the Stacks screen and have permission to add a stack. Keep Portainer's management interface private too.
If Portainer is missing, complete its official Docker/Linux installation prerequisite first. That resource assumes a working Docker engine and administrator command-line access; it is not a Synology graphical installation guide. If those requirements are unfamiliar, get help setting up Portainer, then return when you can reach Stacks.
Keep the NAS address stable
Find the NAS private IPv4 address in DSM network settings. An address reservation is a saved router rule that gives the NAS network adapter the same chosen IP address when it requests one.
Use your router model's instructions. Find the NAS in its connected-client list, match the adapter's hardware MAC address, and reserve its current private IP. Confirm the reservation is enabled, then check that the router entry and DSM show the same IP. TP-Link's official address-reservation example illustrates MAC/IP matching; its menus are not universal. Avoid changing the NAS address blindly while connected remotely.
Create and confirm the storage folders
- In File Station, look for the shared folder
docker. If it is absent, use Control Panel → Shared Folder → Create, name itdockerand choose the storage volume in the wizard. The Synology DSM 7.2 user guide explains shared-folder creation. Grant access only as needed. - Inside
docker, createrxv3, then createdb,exportsanduploadsinside it. Start with an emptydbfolder; do not reuse another PostgreSQL installation's data. - Right-click each folder in File Station and open Properties to read its full filesystem location, including the volume prefix. The JDownloader maintainer's Synology instructions describe this lookup. A sharing link or Windows network path is not the filesystem path needed here.
rxv3/
  db/
  exports/
  uploads/
The configuration uses /volume1/docker/rxv3 as an example. If your location is /volume2/docker/rxv3, change all three bind-mount source paths to volume2. Keep the exact spelling and capitalization.
Check: All three folders exist, and their absolute paths match the three source paths you will use in YAML. These folders hold this installation's saved data.
Choose the addresses and private settings
This worked example uses 192.168.1.50 as an illustrative NAS address. Replace it with your own private IPv4 address everywhere it appears. A port is the numbered connection point after the colon.
| Purpose | Illustrative address | What uses it |
|---|---|---|
| Client: the editor | http://192.168.1.50:8662 | Your browser and the server's PDF printer |
| Server: the application API | http://192.168.1.50:8661 | The client and generated export URLs |
The client runs on port 3000 inside its container; the NAS publishes it on 8662. The server runs on container port 3100, published on 8661. PostgreSQL uses port 5432 within the container network and has no published NAS port in this configuration. Do not use localhost as the NAS address: in your browser, it means the computer running that browser.
Keep both published ports on your trusted LAN. Do not forward them through your router. Limit access to trusted devices using appropriate network controls where needed. Binding to a private NAS address reduces listening on other NAS addresses, but it does not replace access controls or encrypt HTTP traffic.
Prepare these four settings before you deploy:
| Setting | Value to supply | Where it must agree |
|---|---|---|
NAS_IP | Your private NAS IPv4 address, without http:// or a port | Both published ports and both application URLs |
DB_PASSWORD | A new long random password | Database and server |
SECRET_KEY | A separate random secret of at least 32 letters/numbers | Server setting |
JWT_SECRET | Another separate random secret of at least 32 letters/numbers | Server setting |
These are application settings, separate from your DSM login. Save them privately. Administrators who can inspect the stack can see its settings. In the YAML, ${NAME} instructs Portainer to substitute the matching value you supply.
Deploy the stack
1. Open the stack editor
Open Portainer and select the Docker Standalone environment connected to your NAS. Choose Stacks → Add stack → Web editor. Name the stack rxresume-v3.
2. Paste and check the YAML
The configuration below pins both application images to 3.8.4. It uses persistent NAS folders, a database readiness check and an unless-stopped restart policy. These are deliberate adaptations of the historical setup. The postgres:16 choice comes from the Synology recipe; it is not an independently tested V3 compatibility result. Historical upstream Compose used postgres:alpine without a fixed major version.
Paste the following YAML into the web editor. Preserve its indentation. Change /volume1/docker/rxv3 in all three mappings if your folder path differs.
Next: Supply all four environment variables after this block, before deploying.
version: "3.8"
services:
  resume-db:
    image: postgres:16
    restart: unless-stopped
    environment:
      POSTGRES_DB: reresume
      POSTGRES_USER: reresumeuser
      POSTGRES_PASSWORD: ${DB_PASSWORD}
    volumes:
      - /volume1/docker/rxv3/db:/var/lib/postgresql/data
    healthcheck:
      test: ["CMD-SHELL", "pg_isready -U reresumeuser -d reresume"]
      interval: 10s
      timeout: 5s
      retries: 10
  resume-server:
    image: amruthpillai/reactive-resume:server-3.8.4
    restart: unless-stopped
    depends_on:
      resume-db:
        condition: service_healthy
    ports:
      - "${NAS_IP}:8661:3100"
    volumes:
      - /volume1/docker/rxv3/exports:/app/server/dist/assets/exports
      - /volume1/docker/rxv3/uploads:/app/server/dist/assets/uploads
    environment:
      PUBLIC_URL: http://${NAS_IP}:8662
      PUBLIC_SERVER_URL: http://${NAS_IP}:8661
      POSTGRES_DB: reresume
      POSTGRES_USER: reresumeuser
      POSTGRES_PASSWORD: ${DB_PASSWORD}
      POSTGRES_HOST: resume-db
      POSTGRES_PORT: "5432"
      SECRET_KEY: ${SECRET_KEY}
      JWT_SECRET: ${JWT_SECRET}
      JWT_EXPIRY_TIME: "604800"
  resume-client:
    image: amruthpillai/reactive-resume:client-3.8.4
    restart: unless-stopped
    depends_on:
      - resume-server
    ports:
      - "${NAS_IP}:8662:3000"
    environment:
      PUBLIC_URL: http://${NAS_IP}:8662
      PUBLIC_SERVER_URL: http://${NAS_IP}:8661
3. Supply the four variables
Under Portainer's environment variables, add NAS_IP, DB_PASSWORD, SECRET_KEY and JWT_SECRET with the values you prepared. Do this before deployment; none should be missing.
4. Review the matching settings
Read through the configuration once before clicking Deploy the stack:
PUBLIC_URLis the client address;PUBLIC_SERVER_URLis the server address. Both app services must use the same pair.POSTGRES_DB,POSTGRES_USERandPOSTGRES_PASSWORDagree between the database and server.resume-dbis the database's internal network name.- The three volume lines connect the NAS folders to the database, exports and uploads locations inside the containers.
JWT_EXPIRY_TIMEis604800seconds, or seven days.
5. Deploy and find the management controls
Click Deploy the stack, then open Stacks → rxresume-v3. Identify the resume-db, resume-server and resume-client containers in its list; generated names may add the stack name and a number. Check their displayed state.
Open a container's name to reach its details and its start/stop actions and logs control. You can also open Containers from the environment menu and select it there. Use the logs to look for startup errors. Do not select the Portainer container by mistake. The official stack inspection and container details guides describe these screens.
A deployment message alone does not establish that registration, saving or export works. If a container fails, investigate its logs before entering real resume information.
How to stop and start this stack
Use the container details controls introduced above:
- Stop the client, then the server, then the database. Check each shows stopped.
- To start again, start the database first and wait for its health check to pass. Start the server and inspect its logs for repeated startup or database errors, then start the client.
- Check all three are running, then reopen the editor. Running containers are only a starting check; check your saved sample too.
Use this stop/start cycle for the restart check below. For a backup, leave all three stopped until the backup finishes.
What about email?
The historical V3 registration code creates an account without sending a verification email. SMTP is used for password recovery. This minimal stack omits SMTP, so password-reset delivery is not configured; keep your app password in your password manager.
If you later need reset emails, add the historical server settings MAIL_FROM_NAME, MAIL_FROM_EMAIL, MAIL_HOST, MAIL_PORT, MAIL_USERNAME and MAIL_PASSWORD using your provider's details. Test reset delivery separately. Registering successfully does not prove that email works.
Create and check your first resume
From a computer on the same trusted network:
- Open
http://192.168.1.50:8662, replacing the example IP address with your NAS address. - Choose Register and create an application account. This account is separate from your DSM login.
- Choose Go to App → Create New Resume. Enter a title and a slug: a URL-friendly name, for example
nas-setup-sample. Then open the resume. These labels come from the historical English recipe and may differ with language. - Add clearly fictional content. For example, name the resume “NAS setup sample” and use an invented work entry. Use only fictional information until these checks are complete.
- Reload the page, then sign out and sign back in. Open the sample and check that your changes remain.
Check that saved data survives a restart
Follow the stop/start cycle above, checking each container state and the server logs as described. Reopen the client address, sign in again and open the same sample resume.
Check: The sample should still contain your changes. Also check that the three NAS folders remain at the paths you configured. This is a reader-run acceptance test; it is not a completed test result from this article.
Check exports separately
Try exporting the fictional sample as JSON and as PDF. Save a successful export on your computer. These are distinct checks: an editor that opens and saves does not establish that PDF generation works.
For PDF generation, the server's printer opens a page using PUBLIC_URL. The server therefore needs to reach the client through the NAS address too. Font loading or network access can affect this process. If PDF export fails, inspect the server logs and check whether the server can reach the client address before changing unrelated settings.
Leave the sample private. A URL containing your NAS's private address does not give an outside recruiter access. Public hosting and sharing need a separate plan; they are outside this initial LAN setup.
Back up before depending on it
The database holds accounts and resume records; uploads and exports hold other application files. Copying just the uploads folder does not preserve the whole installation.
Make a cold folder backup with Hyper Backup
A cold backup is taken while the application and database are stopped. File metadata includes the operating-system account that owns a file and the accounts allowed to read or change it. If restored database files have different ownership or permissions, the container may be unable to use them. A casual download to your computer is not a permissions-preserving recovery method.
Use Synology Hyper Backup folder backup with native Hyper Backup restoration as the named follow-on procedure. Install and configure it using its in-app help and official Hyper Backup specifications. This section defines what to preserve and check; it does not claim a tested restore.
- Export important resumes to JSON. Save the Compose file, environment values and app password privately as well.
- Configure the backup source as the whole
rxv3folder, includingdb,exportsanduploads. Choose a separate destination, such as an external drive. - Follow the stopping order above. Confirm all three containers are stopped before running the backup task, and keep them stopped until it finishes.
- Check that Hyper Backup reports a completed backup, then run its backup integrity check.
- Start the containers in the order above and check the application and saved sample again.
If you schedule future backups, coordinate container shutdown for every run. The first cold backup does not make later copies of a running PostgreSQL database consistent.
Rehearse recovery separately
The linked Synology Hyper Backup restoration procedure distinguishes Restore from Copy to and Download. Copy to and Download lose original permission settings. Restore writes to the original path and overwrites existing files. It does not let you choose an isolated alternate folder in this workflow. Changing a stack's bind-mount path does not change that restoration destination.
Rehearse this method only on a separate test NAS or isolated test environment where the original path cannot refer to production data. An alternate folder and stack on the production NAS is insufficient isolation for this Restore action. If you cannot arrange that test environment, get assistance planning supervised recovery before attempting Restore. Do not experiment on your only copy or restore over an active database. Ownership and permission handling across NAS devices still needs checking.
For the isolated test environment, plan the restored stack's host ports and URLs and retain the same PostgreSQL major version. This is a recovery-planning boundary, not a tested, step-by-step restoration exercise. Before relying on the backup, check these outcomes in that environment:
- The original account signs in, and the expected sample text and any sample uploaded picture return.
- Database and server logs show no repeated permission or database errors.
- You can edit, reload and reopen the sample after the stop/start cycle.
- Restored files retain suitable ownership and access for the containers.
- JSON and PDF exports are checked separately.
These are acceptance checks to perform, not reported recovery results. Record and resolve failures before treating the backup as reliable.
Keep both application images at 3.8.4 while following this procedure. Do not switch them to latest, or change PostgreSQL's major version over the existing database folder. Moving to a current Reactive Resume release needs a separate migration plan.
Troubleshoot, pause or remove the installation
Work from the symptom you can observe. Check logs before changing storage or credentials.
Image download fails or reports “no matching manifest”
Check the exact image tag and NAS CPU architecture. Historical ordinary tags targeted AMD64; ARM64 builds used client-arm64-3.8.4 and server-arm64-3.8.4. Present availability and NAS operation have not been verified.
Address cannot be assigned or a port is already allocated
Check that NAS_IP belongs to this NAS and that ports 8661 and 8662 are unused. If you change a published port, update its corresponding URL in both app services.
Database is unhealthy or password authentication fails
Open the database logs using the management controls above. Check its mounted folder and matching credentials. An existing database retains its initialized credentials; changing an environment variable does not automatically change them. Do not delete saved data to fix a typo.
A log reports “permission denied”
Identify the exact mounted path in the error. Confirm it exists and permits the container's required writes. Do not grant Everyone full control as a blanket fix.
The page opens but registration fails
Inspect server logs. Confirm both app services use the same client and server URLs and that your browser can reach the API on port 8661.
Saved content disappears after restart
Recheck the database bind mount and actual NAS folder path. Keep the existing folders intact while investigating.
PDF export fails
Check server logs and whether the server can reach the client at PUBLIC_URL. Browser access alone does not prove the server can reach that address.
Password-reset email never arrives
The minimal stack has no SMTP settings. Add provider settings and test recovery delivery separately.
For upstream help, identify the deployment as V3 and include the exact 3.8.4 image tags, NAS CPU type and relevant redacted logs. Remove passwords, tokens and resume content before sharing your configuration. Current documentation describes a different deployment.
Pause or undo the installation
To pause, use the stopping order above and check all three containers show stopped. To uninstall, remove the stack in Portainer while retaining /volume1/docker/rxv3—or the actual path you chose—and your saved configuration and credentials. Keep your independent backup until you have checked the exports you need.
Deleting the rxv3 folder deletes this installation's stored database, uploads and exports. Remove it only when you intend to erase those data. Recreating containers against the retained original folders is different from restoring an independent backup.