

Set Up Plex on Synology for Your First Local Playback
Install Plex on Synology, give it access to your media folder, and check your first local browser playback and package restart.
Eugene Gavrilov
8 min read- NAS & storage
Start with one movie or TV episode on your Synology NAS and a browser on a computer at home. The goal is to see that file in a Plex library, play it, then play it again after restarting the package. These are checks for you to perform, rather than results from a tested NAS.
Plex Media Server runs on the NAS: it organizes your media and sends it to a player. Plex Web App supplies the player in your browser. A library is the collection you create in Plex and connect to a folder containing your files.
This guide follows a fresh DSM 7 installation using the official Plex installation package, an .spk file, through DSM's graphical interface.
Before you install
Have these ready:
- Your NAS model and DSM version. In DSM, open Control Panel → Info Center → General and record both.
- A compatible Plex package for that model, its processor architecture and your installed DSM version. Check the choices on the official Plex downloads page against your NAS details. If you cannot identify a compatible package, stop here; availability depends on the hardware and DSM version.
- A computer on the same home network and subnet as the NAS—a subnet is a local group of network addresses—plus a Plex account and internet access for account setup. Your DSM login administers the NAS; your Plex account associates the media server with you.
- One movie or TV episode you own or can legally use. An MP4 containing H.264 video and AAC audio is a useful first browser sample because it is usually compatible with browsers, although playback is not guaranteed for every file or browser.
Find the NAS's local IP address in Control Panel → Info Center → Network. This address identifies the NAS on your home network. Keep it nearby: you will use it to open Plex after installation.
For this setup, leave remote access disabled. A local Plex address does not require a domain name, router port forwarding, reverse proxy or certificate setup.
Install the official Plex package
Download the compatible Synology .spk from Plex. In DSM:
- Open Package Center → Manual Install.
- Use Browse to choose the downloaded
.spk. - Check the package information and complete the installation with Apply.
- Open the installed Plex Media Server package and check that its status is Running.
These steps use Synology's manual package installation procedure.
Give Plex access to your media folder
Keep your videos in a dedicated media shared folder, separate from the PlexMediaServer shared folder. The latter holds application data; do not put movies there or change its permissions to make a library work.
On DSM 7, the identity that needs permission to read your videos is the system internal user PlexMediaServer. Giving your own DSM account access does not replace this step. For local playback, grant Plex read access to the media share and its contents.
- Open Control Panel → Shared Folder.
- Select the shared folder containing your media, then choose Edit → Permissions.
- Change the user category to System Internal User.
- Find PlexMediaServer and grant read access. Apply the permission to the folder, subfolders and files. The wording may vary with DSM; use the custom permission options if needed to set read access.
The Plex DSM 7 permission guidance describes this system-user procedure.
For movie and TV collections, keep the two types in separate directories and separate Plex libraries. Point a library at its type's root folder, rather than at an individual movie or show. These are illustrative naming patterns recommended by Plex:
Movies/Title (Year)/Title (Year).ext
TV Shows/Show (Year)/Season 01/Show (Year) - s01e01.ext
Replace the words with the actual title and year. Keep the file's real extension: .ext is a placeholder in the pattern. In the TV example, s01e01 identifies season 1, episode 1.
Open Plex and add the folder to a library
Use the local IP address you recorded earlier. In the address below, NAS-LAN-IP means that address, 32400 selects the Plex service, and /web opens its browser interface. Enter this in the browser on your computer:
http://NAS-LAN-IP:32400/web
For example, only if your NAS address were 192.168.1.50, you would enter http://192.168.1.50:32400/web. This is an illustrative address; substitute your own. Do not use localhost on your computer, which would point to that computer rather than the NAS.
Sign in with your Plex account to associate the new server with it. Use the NAS's local address for this first setup: Synology QuickConnect cannot directly claim a new Plex server. If authorization gets stuck, try the same local address in a private browser window.
Give the server a recognizable name and leave remote access disabled. You can check that setting in Settings → Server → Remote Access.
To create the library:
- Open Settings and select your NAS's Plex server.
- Under Manage, select Libraries → Add Library.
- Choose the library type, name and language.
- Select the source folder containing the chosen media and finish adding the library.
Follow the Plex library creation guide if you need help with those choices. Check that your selected file appears in the library before moving on to playback.
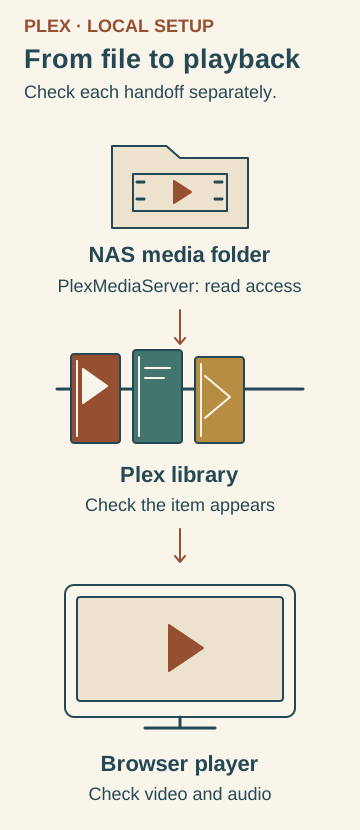
Folder access, library discovery and playback are separate checks. Original Huncode conceptual diagram based on Plex’s folder guidance, library guide and browser-player guide.
Give the system internal user PlexMediaServer read access to the dedicated media shared folder and its contents. Connect that folder to the appropriate Plex library and check that the item appears. Open it in the local browser player and check both video and audio. These are reader checks, not recorded playback results.
Play the file and check the result
Open the item's details in Plex Web App and select Play. You can perform this first check in the browser without installing a separate TV or mobile app.
Confirm that the video actually plays and that you hear its audio. A visible item proves discovery; an open server page alone does not establish successful playback.
If something fails, use the symptom to choose the next check:
| What you see | What to check next |
|---|---|
| The local Plex page does not open | Recheck the NAS IP address, the computer’s connection to the same local network, and the package’s Running status. |
| The library is empty or the file is missing | Recheck the selected source folder, library type, the PlexMediaServer user’s read permissions, and file naming. |
| The item appears but playback fails or buffers | Try the H.264/AAC MP4 sample. |
Conversion can explain why a file is visible but difficult to play. Direct Play sends a compatible file unchanged. Direct Stream repackages its tracks. Transcoding converts incompatible tracks, and subtitles can also trigger video conversion. The NAS's ability to perform that work varies.
Hardware-accelerated streaming is a separate option requiring compatible hardware and software and an active Plex Pass on ordinary Synology setups. You do not need to configure it just to attempt this first local playback.
The subscription requirements for remote personal-video playback do not apply to this local playback check. That does not establish the requirements for every Plex app or feature.
Restart Plex and preserve the setup
After the file plays, stop Plex Media Server in Package Center and start it again. Reopen the local address, check that the same library item remains, then play it again. This is your persistence check; record the result for your NAS.
Keep media and server data separate
Your videos live in the media folders you selected. Plex's server data contains its settings and metadata. On DSM 7, the documented default server data directory is:
/volume1/PlexMediaServer/AppData/Plex Media Server
Your installation may use a different volume. Record the actual location along with your media folder paths.
Back up the full server data directory and keep that backup outside the directory itself. Back up your media files separately. As a conservative precaution for a consistent copy, stop the Plex package before copying server data.
Update without discarding the library
Before updating, preserve a backup of the server data and keep the installer and version details for the installation you are backing up. Download a compatible official Synology .spk and use Package Center → Manual Install to update the package. Preserve both the media and server data, then repeat the library and playback checks.
If an update causes trouble, stop the package first. Do not delete the media share or application data to fix a missing library. A recovery may involve reinstalling Plex and restoring backed-up server data to its original location, following Plex's backup and restoration guidance. Installing an older package alone is not a dependable rollback: compatibility with a database changed by a newer release is not established here.
Before uninstalling, preserve those backups and read the data-retention choices in the uninstall dialog. Do not assume removal will retain all server data.
You have completed the first-play task when the package runs, the chosen item appears, playback works, and the same item still plays after restarting the package. Keep the media paths, server data location and backup with your setup notes.
Documentation checked on November 4, 2026. This is a source-grounded DSM 7 procedure; no physical NAS installation, playback or restoration test is claimed.