

Install Pinchflat on Synology and Find Your YouTube Downloads
Install Pinchflat through Synology Container Manager, connect settings and download folders, open it locally, and check a completed file after restarting.
Eugene Gavrilov
11 min read- NAS & storage
Want your Synology NAS to save videos from a YouTube channel or playlist? Pinchflat manages that recurring download job through a browser. This guide sets it up on your home network, gives its settings and downloads a known home, and finishes with checks you can perform yourself: find a completed file, restart the app, and check that your settings and file remain.
Use a separate compatible player, such as VLC, to watch the completed files. This walkthrough covers downloading and storage, not player setup.
The route below uses Container Manager > Project throughout. It is documentation-based and has not been tested on a physical NAS.
Check your NAS before creating anything
Before beginning, you need an existing local docker shared folder that you can write to. If it is missing, stop and follow Synology’s shared-folder setup help before continuing; do not guess a storage path. This walkthrough creates the app's subfolders inside that existing share.
- Open Control Panel > Info Center > General and note your NAS model and DSM version.
- In Package Center > All Packages, find Container Manager. If it is available but not installed, select it and click Install, then open it. You need its Project section for this route. Synology renamed Docker to Container Manager starting with DSM 7.2; availability still depends on your NAS. If the package or Project section is unavailable, stop and check support for your recorded model and DSM version.
- Find the NAS address as explained next and record it before creating the project.
Your NAS's local IP address is its numeric address on your home network. In Control Panel > Info Center > Network, find the IP address for the network used by your computer and NAS. Record it without changing any settings. If several addresses are listed and you cannot identify the one for your home network, resolve that before continuing.
For example, 192.168.1.20 is an illustrative address; use your actual NAS address. Keep the computer and NAS on a trusted home network. This guide does not configure router forwarding or a public portal.
Understand the app and its two folders
An image is the packaged app. A container is its running instance. Compose is the configuration text that tells Container Manager which image to run, which settings to pass to it, and which folders to connect. The environment section supplies app settings at startup.
Pinchflat uses two important folder names inside the container: /config for its settings and database, and /downloads for downloaded media. You will connect each to a real folder on your NAS. These connections let you keep the app's data in locations you can find independently in File Station. Both NAS folders must be writable by the container.
In File Station, create a pinchflat folder in your existing docker shared folder. Inside pinchflat, create two folders named config and downloads. Folder creation controls can vary with DSM version.
This guide uses the following illustrative NAS paths:
/volume1/docker/pinchflat/config/volume1/docker/pinchflat/downloads
To obtain the actual paths, right-click each new folder in File Station and open Properties > General. Copy the Location path for config, then for downloads. Use those full paths in the configuration; do not assume that your volume is volume1. If you cannot identify the paths, stop before creating the project.
The NAS path and the container path have different jobs: /volume1/docker/pinchflat/config identifies the example folder on the NAS; /config is the name Pinchflat uses to reach it.
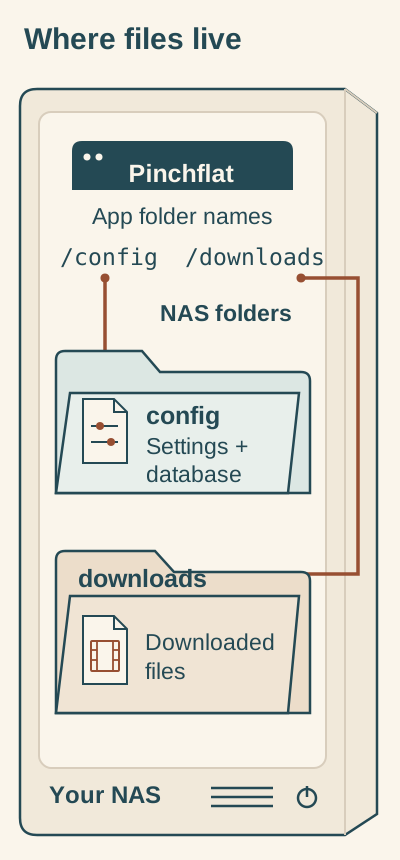
Each app folder connects to a folder you choose on the NAS. Set the actual NAS paths during installation.
Connect the NAS config folder (settings and database) to /config in Pinchflat, and the NAS downloads folder (downloaded files) to /downloads. Use the actual NAS paths you created above.
Create one Container Manager project
A port is a numbered entry point for an app. This setup uses port 8945 on the NAS and port 8945 inside the container. The port mapping will also include your NAS's local IP address so it binds to that chosen address. That binding does not encrypt traffic or replace your network's security controls.
In Container Manager, open Project > Create. Set Project Name to pinchflat, choose your NAS pinchflat folder as Path, and choose the Source option that creates a Compose file using the editor.
Prepare these values before pasting the configuration:
- Replace
YOUR_NAS_LAN_IPwith your NAS's actual local IP address. - Replace both credential values with your own username and unique password. Keep a private record of them; you will need them when you open the app.
- Replace the two example NAS paths if your folders are elsewhere. Keep the container-side names
/configand/downloads.
The supplied image is pinned to a digest, an identifier for fixed image content. This digest was recorded from the official package listing on November 4, 2026; it does not establish a current app version or hardware compatibility.
services:
  pinchflat:
    image: ghcr.io/kieraneglin/pinchflat@sha256:01b4f98aabaf3f5fe394213f7a32578c9e84e42080f52e2f8334021a4473b202
    environment:
      TZ: 'UTC'
      BASIC_AUTH_USERNAME: 'YOUR_OWN_USERNAME'
      BASIC_AUTH_PASSWORD: 'YOUR_OWN_UNIQUE_PASSWORD'
    ports:
      - 'YOUR_NAS_LAN_IP:8945:8945'
    volumes:
      - /volume1/docker/pinchflat/config:/config
      - /volume1/docker/pinchflat/downloads:/downloads
Here is what each field means:
serviceslists the app services to run.pinchflatnames this one service.imageselects the packaged app, including the fixed digest discussed above.environmentholds startup settings.TZ: 'UTC'sets the timezone to UTC; it is a supplied value you can keep for this setup.BASIC_AUTH_USERNAMEandBASIC_AUTH_PASSWORDset the browser access credentials. Set both: leaving either unset disables Pinchflat's optional Basic authentication.portsconnects the chosen NAS address and port to the container's port. The three parts ofYOUR_NAS_LAN_IP:8945:8945are the NAS address, NAS port, and container port, in that order.volumesconnects storage. In each line, the NAS folder is before the colon and the container folder is after it.
Keep the indentation shown. The password value uses single quotes: an apostrophe within it must be written as two apostrophes. Compose also interprets dollar signs; write $$ for each literal $ in your intended password. These are configuration escaping rules, not a requirement to avoid punctuation in your password. Protect the Compose file and its backups because they contain your credentials.
Leave the optional Web Station portal disabled. Confirm the settings, choose Done, and start the project when prompted.
Open the local page and sign in
A browser address for this setup combines http://, your NAS's local IP address, and the port after a colon. For the illustrative NAS address above, it would be:
http://192.168.1.20:8945
Use your actual address. Enter the username and password from your Compose configuration when prompted. HTTP is unencrypted, so keep this walkthrough on your trusted local network.
You do not need a domain to use this numeric address. A domain is a readable name that DNS maps to an address. HTTPS adds encryption and uses a certificate to identify the endpoint; setting it up or opening access from outside your home is outside this walkthrough.
Give Pinchflat one small job
A media profile is the set of rules for downloads. A source is the channel or playlist you ask the app to monitor. Create the profile first, then use it for a small source.
Marius Hosting’s Pinchflat installation guide uses this profile sequence: New Media Profile, choose Default, select Load Preset, then Save Media profile. These labels come from that guide and have not been independently verified in the current app; they may differ in your version.
For your first source, choose a playlist containing just one short video that you have permission to download. This is an illustrative small test job; do not begin with an arbitrary large channel.
- Choose New Source, enter the full playlist URL and a recognizable name, and select your media profile where requested.
- Before saving a source that can start downloads, turn off Download Media. Save the source with that option disabled.
- Open the source's Pending Media page and reload it; the list does not update live. Continue only when the listed items match the small job you intended.
- Enable Download Media for that source and save it. Wait for the sample download to complete before adding more sources.
If you cannot identify the download control or the pending list in your version, stop here and consult the Pinchflat FAQ before enabling a larger source.
Find a completed file, then restart
A running app is only the first checkpoint. Perform these checks before expanding the workload:
- Find a download that Pinchflat reports as completed. Open your NAS
pinchflat/downloadsfolder in File Station and locate its actual media file. - In Container Manager, select the project and choose Action > Restart.
- Reopen the local browser address. Check that the saved media profile and source are still present, then find the same downloaded file again in File Station.
If the source, profile and downloaded file are still there, your first setup check is complete. If settings disappear, inspect the NAS path connected to /config before adding more sources. If the file is missing, compare the folder you opened with the NAS path connected to /downloads.
The remaining sections are for later, when you choose to pause, update or remove the installation.
Pause the app without removing it
For a reversible exit, select the project in Container Manager and choose Action > Stop. Leave the project and its NAS folders installed. You have finished pausing the app; no removal action is needed. When you want to resume, use Action > Start, which starts the existing containers without rebuilding them.
Make a backup before updating or removing
A backup needs the settings, downloaded files and the configuration that describes the installation. Stop the project before copying them.
- In File Station, open the project folder you selected as Path during creation. Locate
config,downloads, anddocker-compose.yml. The editor route uses that filename in the project working directory; verify that the actual file is present. If it is missing, stop and locate or export the active YAML configuration before proceeding. - Check and record the owner under Properties > General and the access settings under Properties > Permission for the data you need to restore. You will need to be able to restore the required ownership and permissions too.
- Select the two folders and
docker-compose.yml. Right-click and choose Copy to/Move to > Copy to. Select a separate restricted backup folder outside the project folder, then choose OK. Use Copy to, not Move to. - Confirm the copy completed and that all three items are in the backup destination. Check their owner and permissions separately; an ordinary copy is not a guarantee that every access-control setting was preserved. Keep the credentials in the Compose file protected, and retain its old image digest.
If you cannot establish a complete backup and a way to restore its data and required permissions, stop before updating or deleting. This recovery procedure has not been restore-tested here. If you are postponing the change, use Action > Start to resume the current installation.
Apply an update, with the old backup available
Choose a newly published image digest from the official Pinchflat package listing. Keep the old identifier in your pre-update backup. A digest selects fixed image content; it does not automatically advance to a newer image.
With the project stopped and backed up, open Details > YAML Configurations and replace the image identifier with the selected new digest. Apply/deploy the edited configuration using the control offered in that pane and follow its confirmation prompts. Synology documents this workflow but does not name the final button in its help; if the control is unclear in your version, consult Synology's official Project instructions at this point before continuing. Start or Restart alone does not replace applying the changed configuration.
Start the project if needed, then repeat the login, completed-file and restart checks above.
If the update fails, stop the app and preserve the failed state separately. Restore the pre-update data folders and Compose file with its old digest. Apply the restored configuration through the same YAML Configurations workflow and official Project instructions, then start and repeat the checks. An update may change the database, so returning only to the old image is not a reliable rollback plan. Seek project help if you cannot restore the paired data and configuration.
Remove the installation only when you intend to
Stopping is enough for the reversible exit above. For permanent removal, stop the project and complete the backup first, then follow Synology's official project removal instructions. Read the confirmation before committing: Synology describes Delete as removing project data too. Do not assume project removal preserves your NAS folders.
Treat deletion of the NAS config and downloads folders as a separate decision. Remove them only when you intend to erase their contents and have kept any backup you need.
If a checkpoint fails
- The project will not start: read the creation or image-download error first. Compare indentation, substituted values and NAS paths with the configuration. Check registry access if the image cannot be downloaded.
- The NAS port is already in use: choose an unused NAS port. For example, change the mapping to
YOUR_NAS_LAN_IP:8946:8945and use:8946in the browser address. Keep the container port at8945. - The browser page does not open: check that the project is running and that the NAS IP and browser port match the configuration. Keep your computer on the local network; do not add router forwarding to troubleshoot this installation.
- The credentials fail, or no authentication appears: check that both authentication fields are set and that punctuation is escaped correctly. Apply changed settings through Details > YAML Configurations before retrying, following the linked Project instructions above if the final control is unclear.
- The app reports a permissions error: check the two folder mappings and the container's write access. There is no universal user-ID or broad-permission fix established for this guide.
- The page opens but downloads do not finish: inspect source status and app operation logs for yt-dlp errors. Queues and rate limits can delay work; keep the first source small instead of repeatedly forcing a large workload.
Use the Pinchflat FAQ for app behavior and Synology's Project help for project controls. Remove credentials before sharing a configuration or error report.